FAQ
Frequently Asked Questions
You encounter a problem or need help? In our FAQ section we have summarized common questions and possible solutions for you.
(Please note that our FAQ are currently available in English only)
Filter
-
I would like to return material. How do I proceed?
Prior to return shipment, please request our authorization to return material/equipment and an RMA number by mail (). Within one working day you will receive your RMA number. Enter this RMA number and all other requested information in the RMA form on page 2 of this PDF document. Return the materials/equipment to us along with the completed RMA form. Please note: Materials returned to the vendor for repair, credit, refund, replacement or exchange must always be insured for the full value of the goods. Please specify the purchase price as the value to be insured.
-
How do I set the sequencer?
Using the sequencer assistent of our SVCapture2 makes it very easy to configure a sequence of images with different exposure timings and strobes.
Check out this tutorial:
-
Why is my camera loosing frames?
A GigE/10GigE camera requires performance PC hardware, e.g. Intel Pentium i5/i7 Quad Core, 8/16GB RAM, Activation of 9K jumbo frames and the GigE filter driver must be installed. All switches between a camera and the PC also must be high performance Gigabit Ethernet switches. Please be also sure that you use a CAT5e/6 LAN cable. If any of these prerequisites are not met this can be a reason for frame loss.
Further it is known that Windows interrupts applications in user space for several hundred milliseconds at random. Despite properly handling the image data stream in the Windows kernel driver, the user space application would not cope with processing those images and a buffer overflow would take place.
With Windows10, active energy save options can slow down the network speed. Please disable all energy save options and set the PC to high performance.
On a laptop, the power supply must be connected during startup in order for the CPU and the network to operate in the optimized condition.
For 10GigE we recommend using 10GigE network grabber cards (e.g. Myricom 10GigE Grabber) which perform the package handling/image processing on the grabber card side and not on the PC CPU. With this grabber cards it is possible to receive all frames (no image lost).
-
Which network adapter is recommended?
We recommend the network adapters from Intel like the i350 v2 (GigE) or the x710 series (10GigE). Please also install the Intel Pro Network driver if you use Intel NIC’s. For 10GigE, we recommend 10 GigE grabber cards (e.g. Myricom 10GigE grabber)
-
Why does the Dual GigE camera (EVO/HR) not take pictures?
If you have only one LAN cable connected, please be sure that it is connected to the master LAN of the camera. This is located diagonally across from the Power Hirose connector. Also check if the LAN teaming configuration settings are correct.
-
Why can't I open the RAW file from my camera?
RAW is the raw image information from the camera and needs a conversion and interpolation (bayer by color) to an image file format. To open a Bayer/Mono 12Bit Packed RAW image from our camera you need a program that can decode the RAW. Most programs cannot handle the 12bit packed GigE Vision Standard RAW images (only 8 and 12Bit). Therefore, it is necessary to unpack the 12bit to 16bit.
-
How can I update the firmware of the camera?
In certain cases it is necessary to update the firmware of the camera. The latest firmware file and the update tool can be downloaded from our website in the download area of each individual camera. Open the Update Tool and follow the instructions. A small guide is included in the Update Tool folder.
-
Why does my GigE Camera not take pictures after Acquisition Start?
Please check if you have set the right Trigger Mode. If the camera is set to external or software trigger mode, the camera is waiting for a valid trigger signal. If the camera is set to Continuous mode (default, trigger mode off), the camera starts the free running image acquisition.
-
Why does my camera take more pictures than I have triggered (extern Trigger)?
This can happen if the trigger line is noisy. To avoid accidental or unintended triggers, use the Debouncer. After using the Debouncer the Camera will only accept trigger signals of a particular length.
-
I can see defect/hot pixel in the image. What can I do?
A certain number of defective/hot pixels are normal. This cannot be avoided when manufacturing the CMOS/CCD sensor. Some of our cameras have implemented a defect pixel correction. With the defect pixel correction feature you can create a defect pixel map which you can load in the camera.
Please see Whitepaper-Defect-Pixelmap-SVCapture2.pdf -
I can see a lens vignetting (shadow) at the edges of the image.
What can I do about it?We call this effect “Shading”. Some of our cameras have implemented a Shading Correction. With the shading correction feature you can create a shading map which you can load in the camera.
Please see Whitepaper - ShadingCorrectionWithSVCapture2.pdf
-
Why do I not see all cameras in SVCapture's Discovery dialog?
Usually, all cameras on all network adapters will be visible in SVCapture's Discovery
dialog. However, all adapters need a different subnet in order to achieve this.
A subnet constitutes the first numbers of an IP address dependent on network mask, e.g.:
1st adapter: 192.168.1.1 / 255.255.255.0 (subnet 192.168.1.x)
2nd adapter: 192.168.2.1 / 255.255.255.0 (subnet 192.168.2.x)
In case the same subnet would be erroneously assigned to both adapters, e.g.:
1st adapter 192.168.0.1
2nd adapter 192.168.0.2
then the routing of network packets in a host computer might become unpredictable and cameras on a certain adapter might be not displayed while still properly discovering cameras on another adapter.
NOTE: When leaving adapter IPs unassigned, this would also provide an erroneous IP configuration when trying to operate cameras on those adapters. The IPs would be:
1st adapter 169.254.a.b / 255.255.0.0 (subnet 169.254.x.x)
2nd adapter 169.254.c.d / 255.255.0.0 (subnet 169.254.x.x)
after having IPs automatically assigned by LLA (local link address) algorithm.
Therefore it is recommended to assign subnets e.g. as follows to all adapters, except those adapters that are connected to a DHCP server:
1st adapter: 192.168.1.1 / 255.255.255.0
2nd adapter: 192.168.2.1 / 255.255.255.0
...
Nth adapter: 192.168.N.1 / 255.255.255.0
-
How can I save the settings in the camera?
You can save your settings in the memory of camera (EEPROM) with the User Set Save Feature.
-
How can I adjust/fix the color of my camera?
Our cameras are not delivered color-calibrated. For light with high infra-red content, an IR cut filter and a white balance color calibration helps. When you do a White Balance, please note that it is the best to use a white, not too dark, but also not overexposed surface as image. Only then can the algorithm of the color correction calibrate the white accordingly.
-
Why does my SVCam EF Lens Adapter not work?
In contrast to different adapters available, we read out the limit values of the lens. This can lead to problems with slow lenses.
Please try this:
1. Restart (power) the camera with the lens adapter connected.
2. Select the SVCam-EF lens adapter in Lens Control type.
3. Close the SVCapture Software, and reopen it again.
4. After Lens Init (not always needed), the lens should now be controllable.
Or:
1. Restart (power) the camera with the lens adapter connected.
2. Select the SVCam-EF lens adapter in Lens Control type.
3. Save this setting in User Sets.
4. Restart (power) the camera again. Now the camera should initialize the lens at the beginning of the reboot. Please be sure that the camera starts with the User Set.
5. After Lens Init (not always needed), the lens should now be controllable.
-
Why do I see a difference in brightness in the sensor?
Some cameras have multi tap sensor and we adjust/calibrate them with a certain exposure time and gain value. If you increase the gain or exposure time, these sensor taps may become visible again. Also a higher operating temperature can cause the differences in the image to become visible again. This sensor tap brightness difference are normal. You can adjust it by yourself with the automatic tap balance feature in SVCapture1. You can find the tap balance feature in the lower part of the SVCapture1 software (see screenshot below). Adjust the camera (exposure, gain) according to your needs and use a homogenous image (without lens) and middle grey value (like in your screenshots). With Tap Balance Auto/Once, the camera will calibrate the taps itself. If the result is ok for you, you can save it with Save to EEprom. If the result after auto balance is not quite ok, you can try to calibrate the taps manually with Manual. Please note that due to the gain step sizes it is not always possible to adjust the taps 100% accurately.
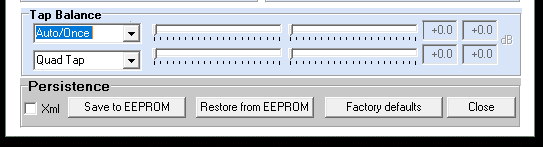
find the tap balance feature in the lower part of the SVCapture1 (© SVS-Vistek GmbH)